up: Scanner Lenses
(re) sources:
- https://www.closeuphotography.com/scanner-nikkor-ed-7-element-lens
- https://www.savazzi.net/photography/scanner-nikkor-40mm.html
- https://www.danielknop.eu/post/film-scanner-lenses-for-focus-stacking-part-2-scanner-nikkor-ed-7-element-lens-nikon-super-coolsc
Intro
At the beginning of our millennium, not only Minolta launched a revolutionary film scanner lens, but Nikon launched two. Both Nikon lenses can be traced back to the Printing Nikkor, an absolutely legendary lens that Nikon developed around 1970 for extremely high-quality reproduction purposes, e.g. in the printing industry, but also for copying cinema films. It consisted of 12 lenses in four groups, and the overall optical qualities such as resolution, correction of chromatic aberration and distortion as well as color reproduction were absolutely revolutionary. The purchase price was roughly equivalent to that of a used car; Robert O'Toole quotes a new price of 2,262 US dollars for the "Printing-Nikkor 95 mm" and the year 1977, which in 2021 corresponded to a purchasing power of 9,886.99 US dollars.
In later versions, this Printing Nikkor received two more lenses, so that it now had 14 lenses in four groups ("Printing Nikkor 95 mm F2.8 A"). At the end of the 1990s, Nikon then decided to build lenses for a 35 mm and a medium format scanner based on the lens calculations of this Printing Nikkor. These developments were completed around the turn of the millennium, so that six prototypes were created, three with a focal length of 40 mm for a 35 mm scanner and three with a focal length of 100 mm for a medium format scanner. The goal was the Coolscan 4000 and 8000 scanners. Marco Cavina provides a detailed overview of this prototype development.
They were followed a few years later by the Coolscan 5000 and 9000 scanner models, in which the larger lens was slightly revised. However, in addition to optimizing the production process – which led to falling scanner sales prices – the aim here was to replace glass materials with toxic additives with other lenses, as this was required by EU regulations. The optical qualities of the lenses should not be affected by this.
They were followed a few years later by the Coolscan 5000 and 9000 scanner models, in which the larger lens was slightly revised. However, in addition to optimizing the production process – which led to falling scanner sales prices – the aim here was to replace glass materials with toxic additives with other lenses, as this was required by EU regulations. The optical qualities of the lenses should not be affected by this.
The medium format model is called "Scanner Nikkor 100 mm" by Nikon and is described in detail in detail here: Nikon Scanner-Nikkor ED 100mm f2.8 lens The 35 mm model is called "Scanner Nikkor ED 40 mm", "Scanner Nikkor ED 7 Element Lens", or in short "Nikon ED 7". It has seven lenses in four groups, a focal length of 45 mm and is apochromatically corrected for both lateral and longitudinal chromatic aberrations (CAs). This leads to particularly high image sharpness because deviations in the individual colors red, blue and yellow are compensated and color edges around subject contours, which cost image sharpness, are avoided.
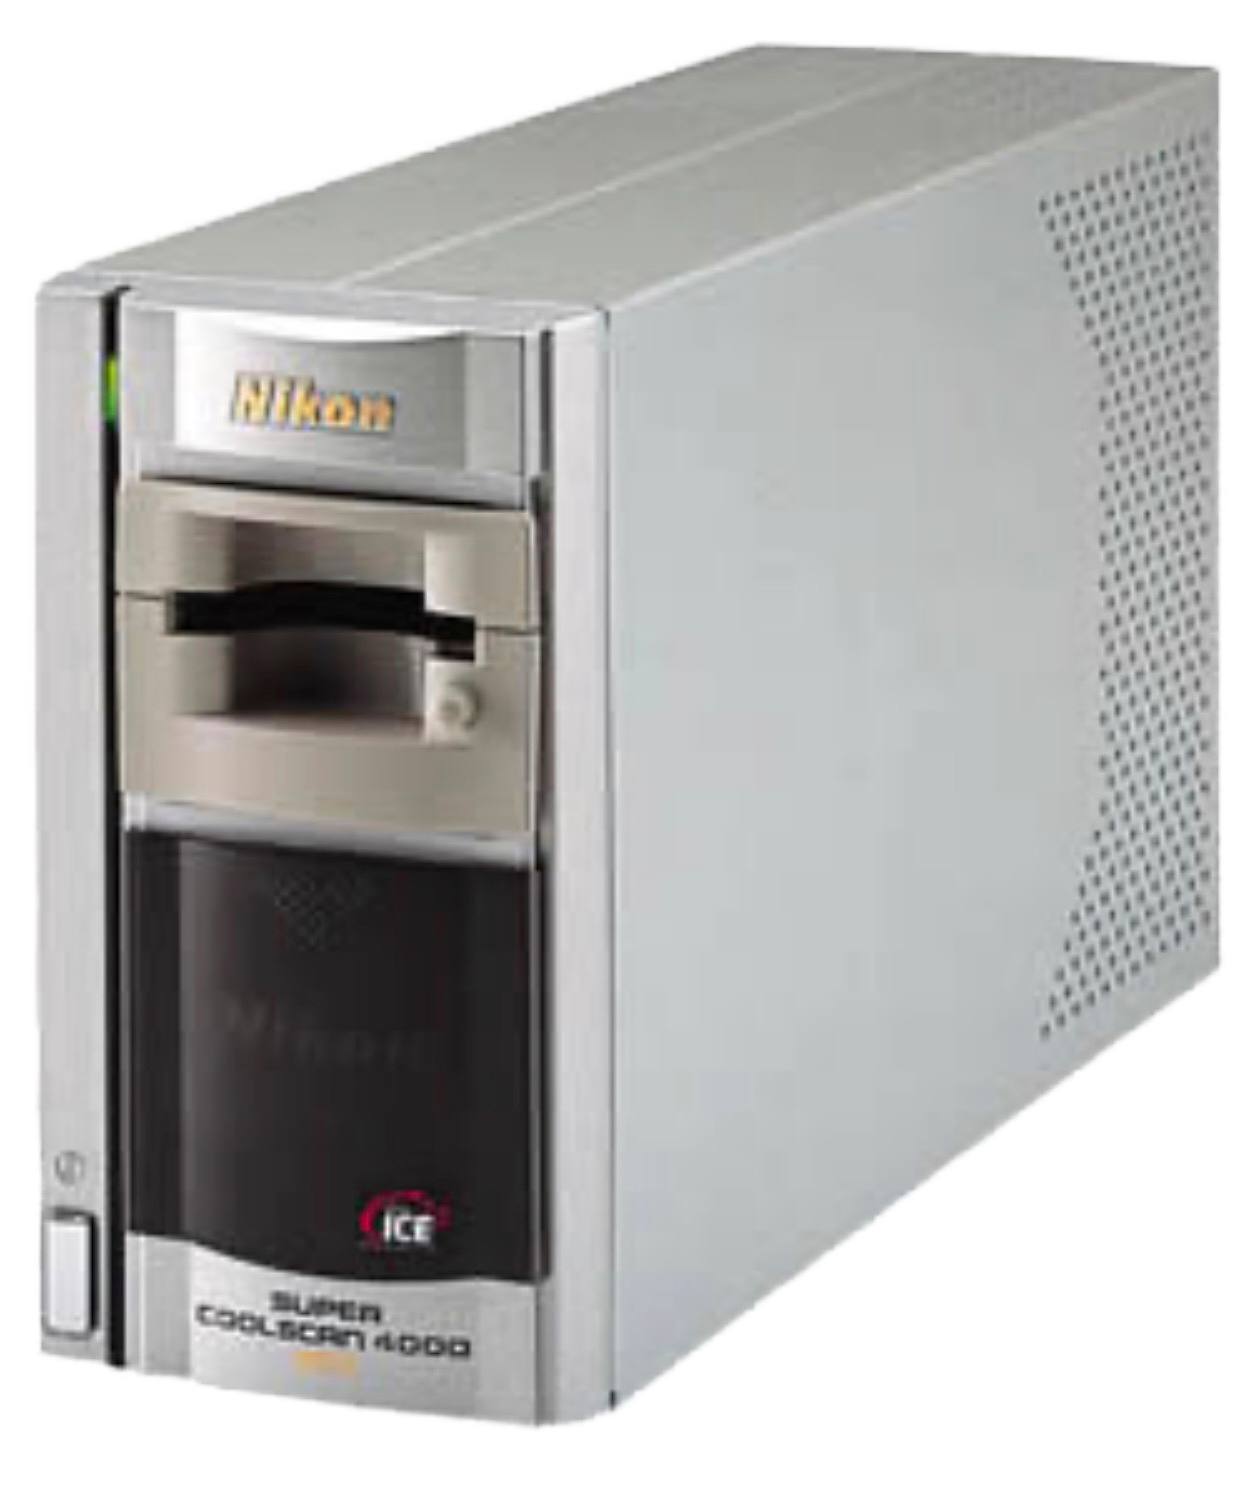
Nikon Super Coolscan 4000 ED film scanner – the first home of the Nikkor ED 7 Element Lens
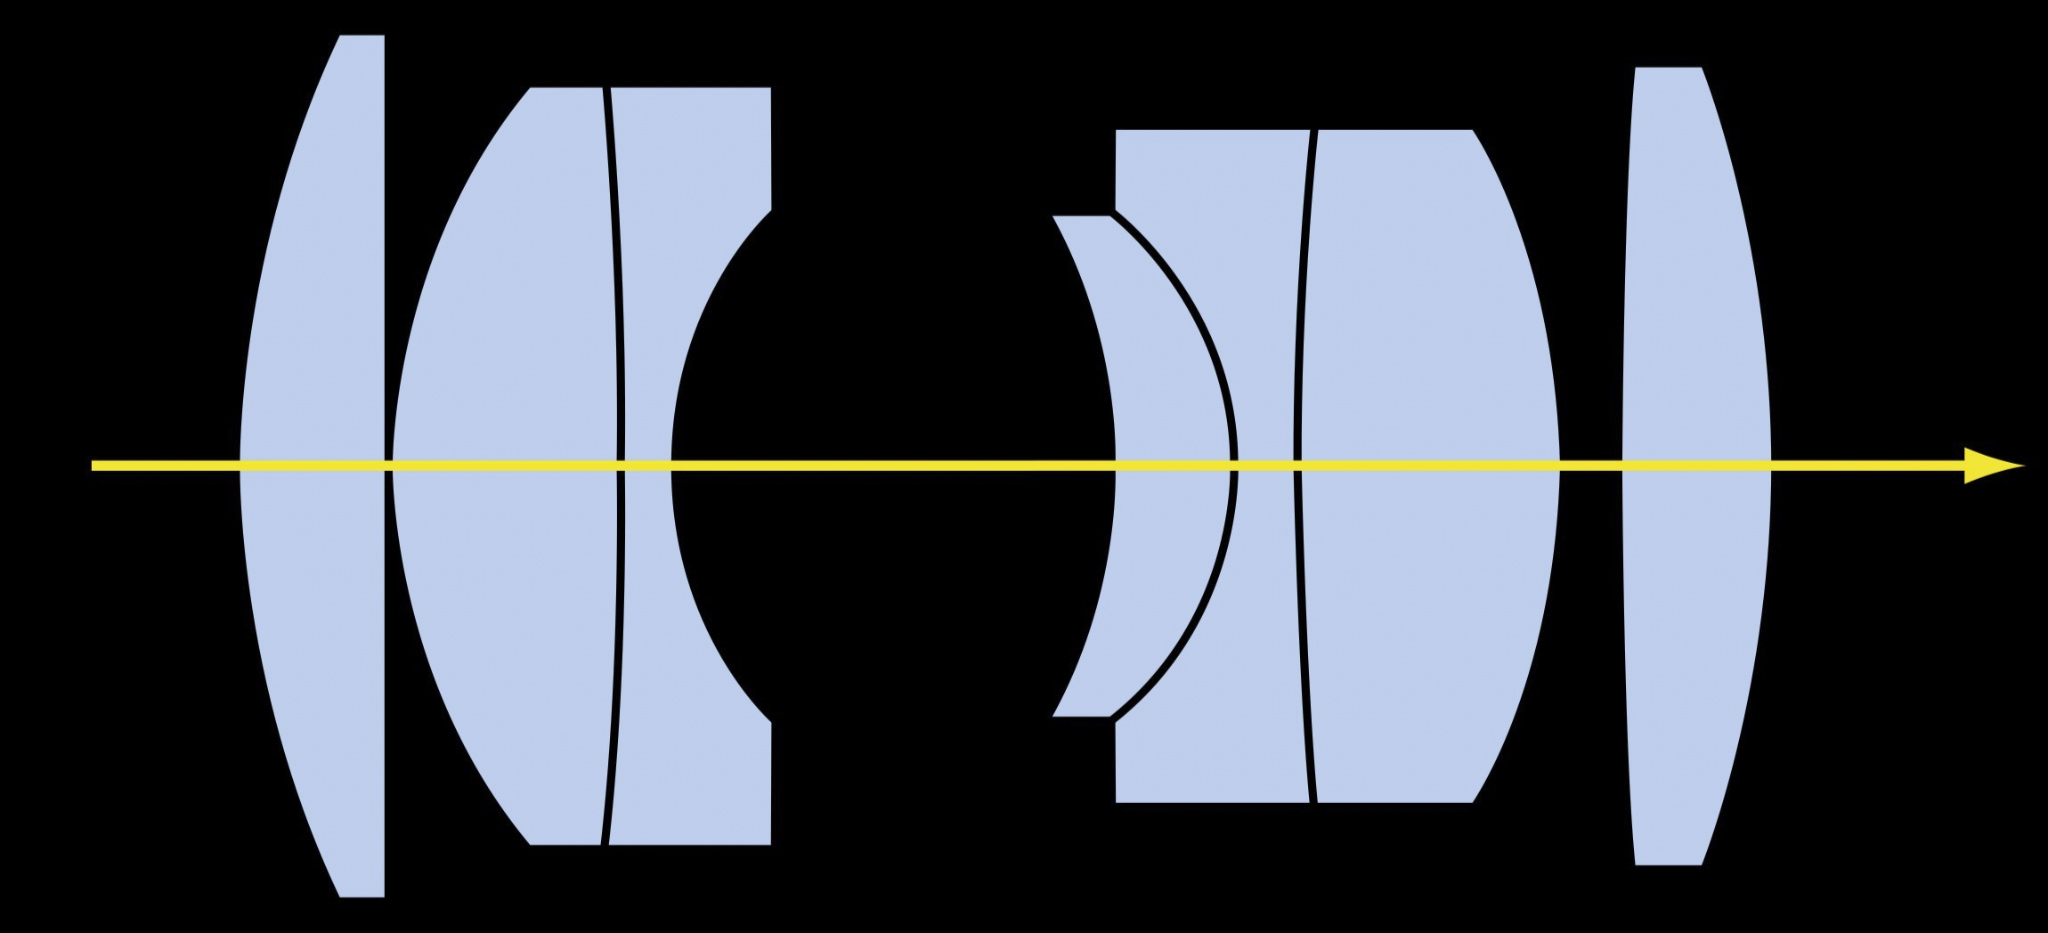
There are seven lenses in the Scanner Nikkor ED 7 Element Lens, arranged in four groups, including three ED lenses (extra-low dispersion), which reduce chromatic aberrations, distortions and loss of sharpness (diagram Nikon company brochure)
Image scale
A scanner sensor is not a rectangle with pixels arranged in a flat pattern as in a digital camera, but has an elongated shape and is therefore very narrow and long. During the scanning process, it moves from one side to the other over the object. The 36 mm wide and 24 mm high 35 mm film strip is scanned at a height of 24 mm by a sensor that is active over a length of 32 mm. This means that this lens enlarges a 24 mm long image edge to 32 mm, which indicates that this lens has been optimized for a reproduction scale of 1.33. On a full-frame sensor, a photographed object is reproduced slightly enlarged. Which is not what we want when scanning 135 sized film on a full frame sensor. Ideally the object should reproduced slightly smaller i.e. we can see the whole negative AND a little bit of its border.
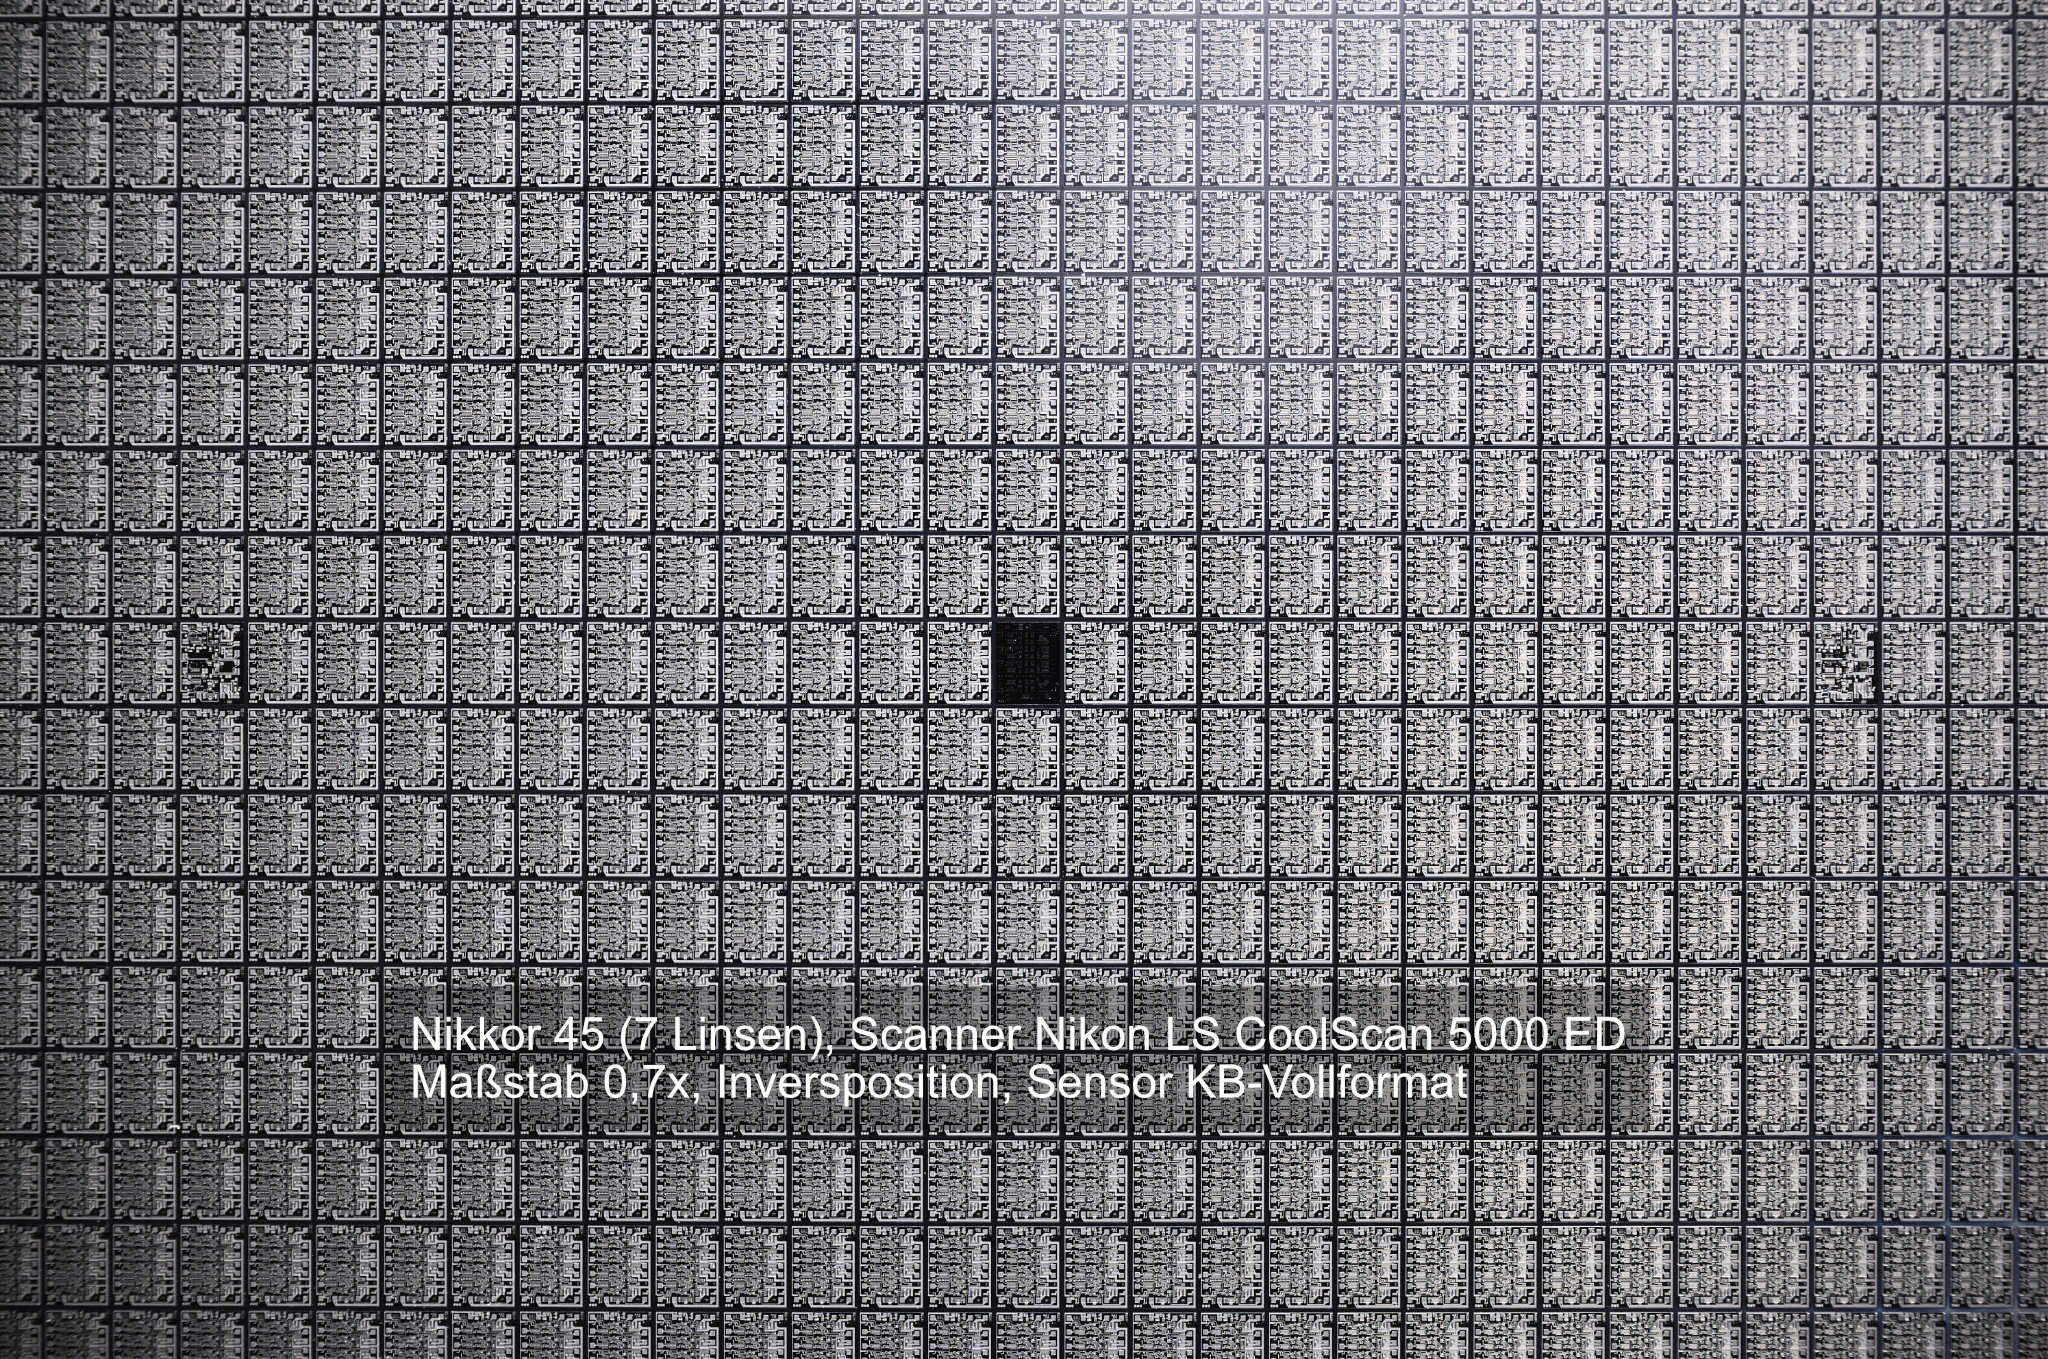
The shooting distance (distance from the object to the light entry lens) is then around 59 mm. By changing the focus distance (distance from the light exit lens to the camera sensor), the shooting distance can be varied, which then also changes the image scale accordingly. Reversed use (inverse position) results in an image scale of 0.75x; an object photographed in this way is therefore displayed slightly smaller on a full-frame sensor. The original position of this lens is useful for reproduction scales of 1:1 to 2:1 or more, the retro position (inverse position) rather below 1:1. This position is what we want when scanning 135 film on a full frame sensor BUT what about the image circle?
Full-frame suitability
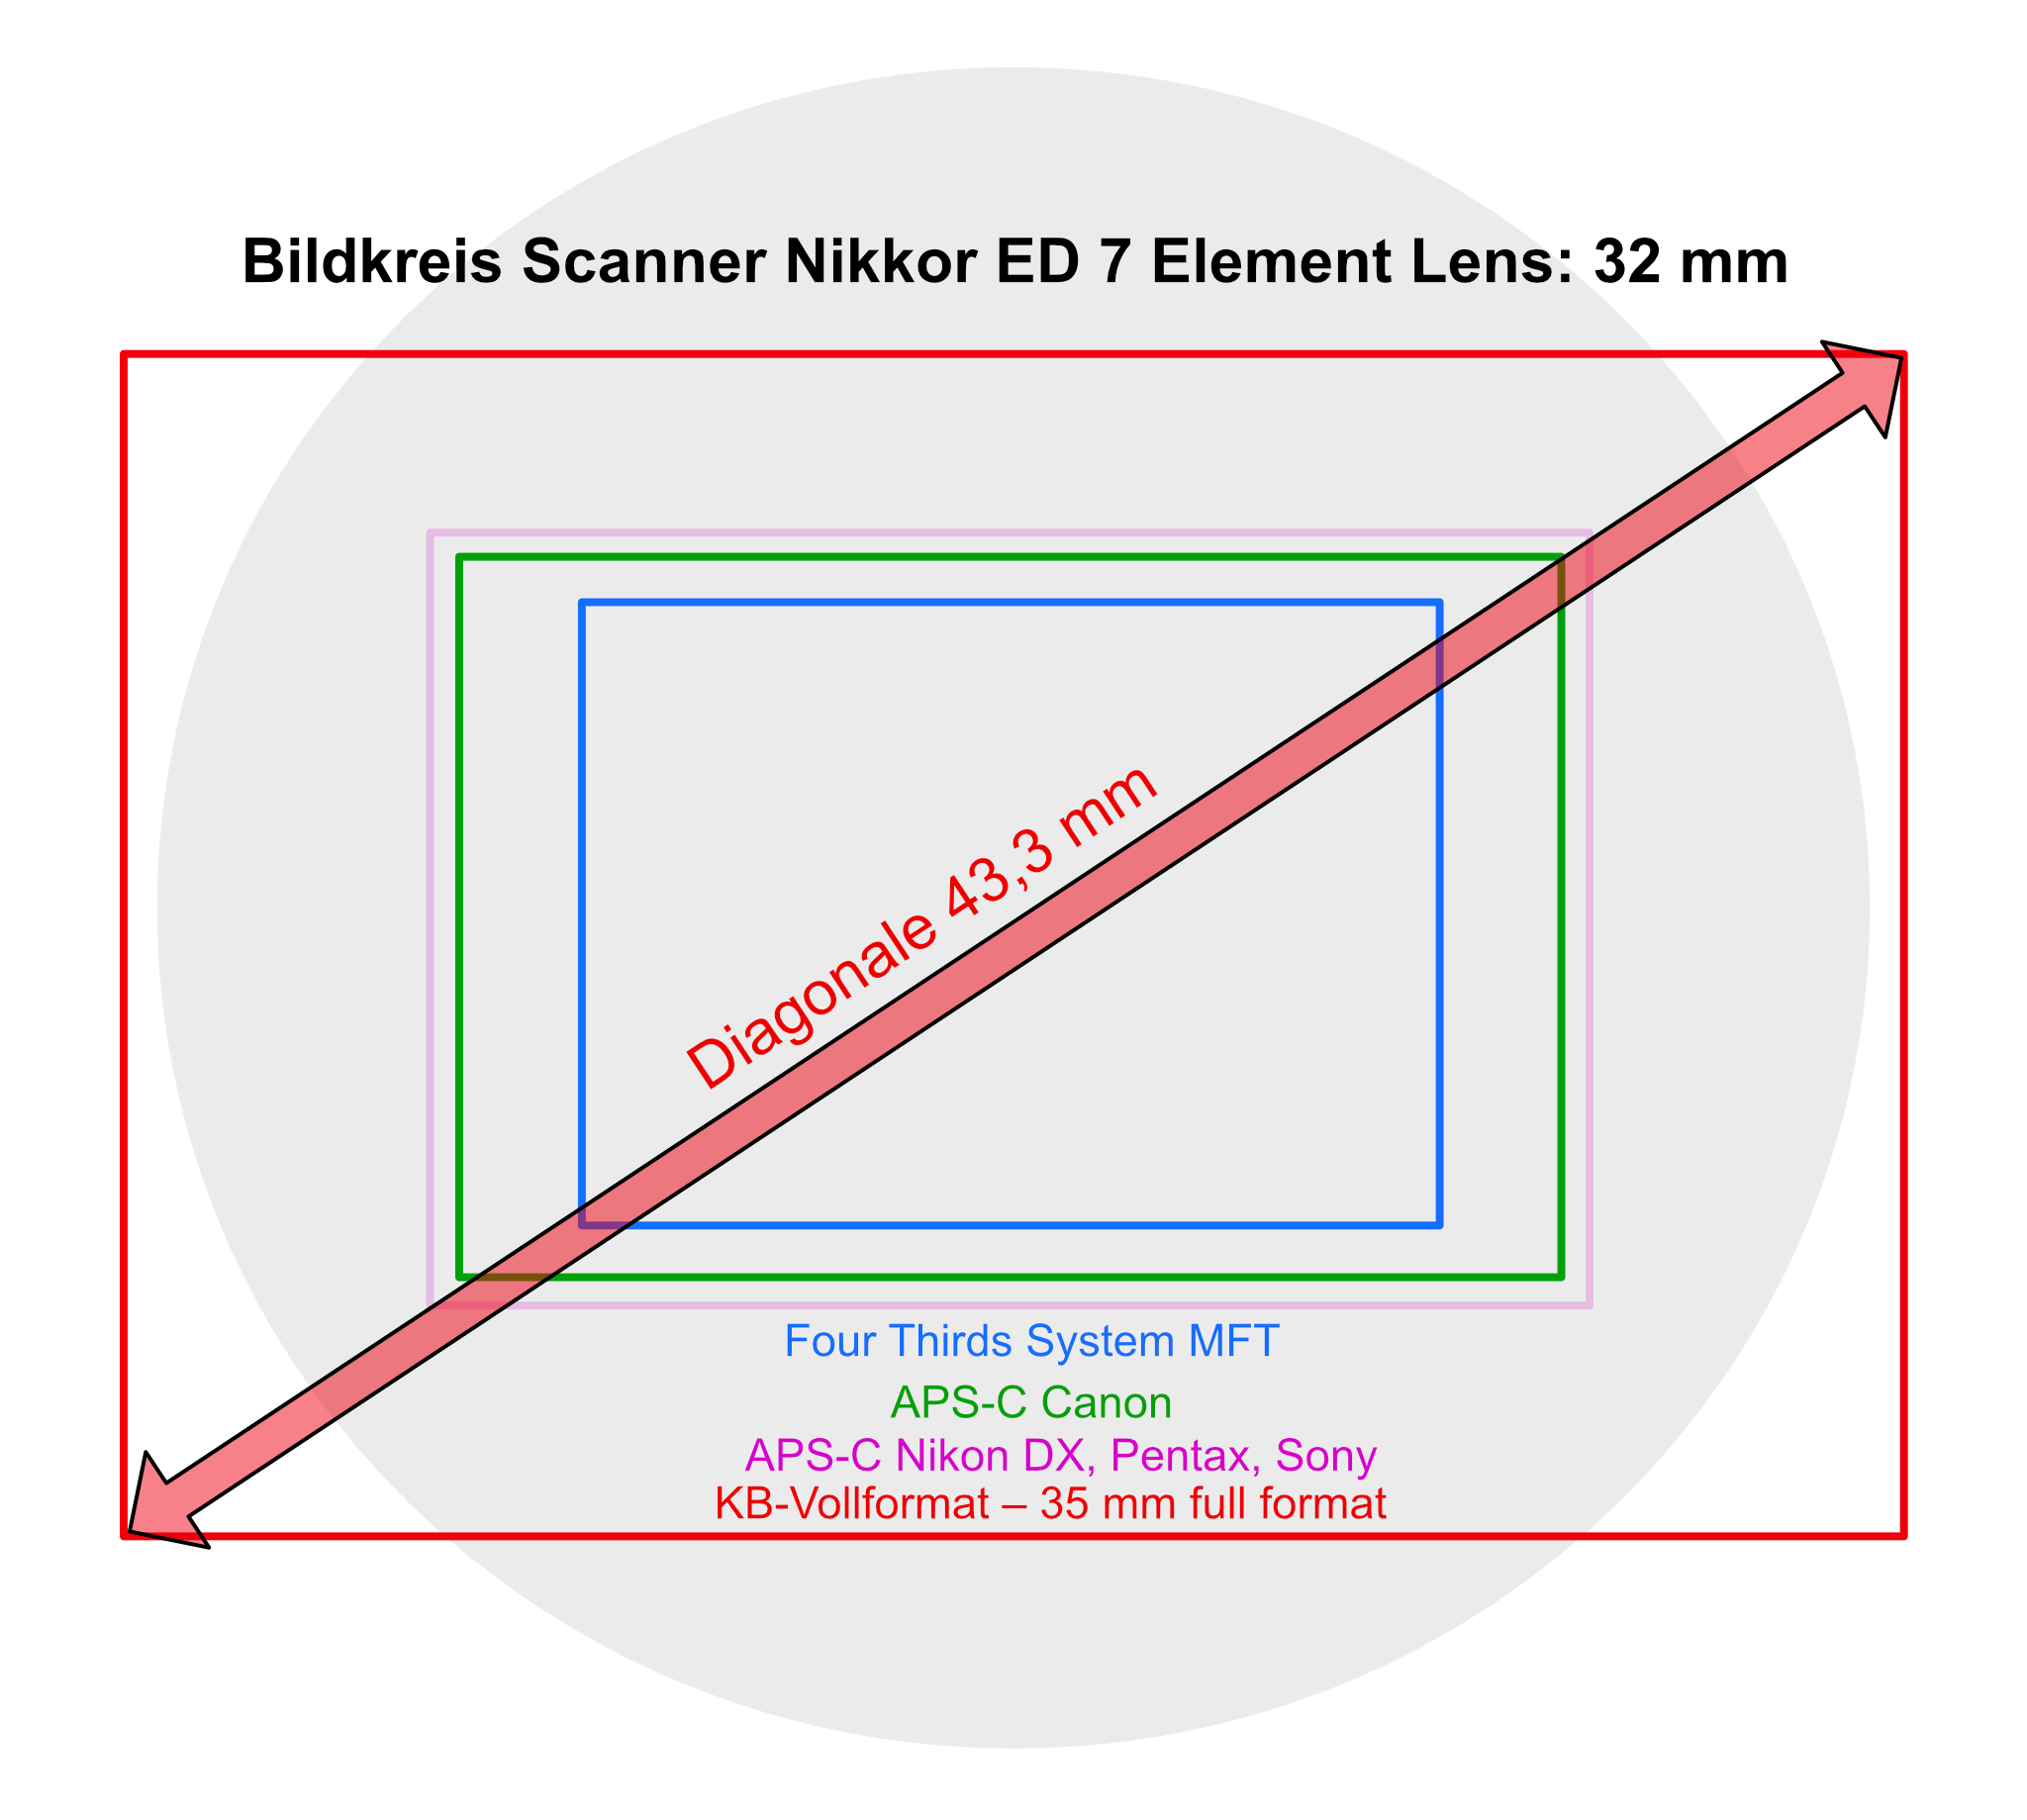
The image circle of the Nikkor ED 7 Element Lens compared to the size of the most common digital camera sensors
Is this lens suitable for a 35 mm full-frame sensor? Yes, but with restrictions. It was designed for an elongated scanner sensor with a length of 32 mm. We produce rectangular images with this lens, but in principle lenses always produce a round, circular image. This is why we also speak of the image circle, and this image circle is effectively cropped to a rectangle in order to obtain our desired image format. Let's assume an image circle diameter of 32 mm for the Scanner Nikkor ED 7 Element Lens. However, our 35 mm full-frame sensor has an active area of approx. 24 x 36 mm, which results in an image diagonal of slightly more than 43 mm. This clearly exceeds the lens image circle of 32 mm, as can be seen in the diagram. For this reason, at least darkened corners are to be expected at a reproduction scale of 1x in full-format, because this lens does not cover the entire sensor surface.
In my test with a full-frame sensor (Canon R3), it showed slight corner darkening at a magnification of 1.3x, but this is unlikely to be significant for many centered objects and is probably largely negligible in practice.
At smaller image scales from 1.2x, the slight corner darkening begins to become more pronounced, and at 1x it can already be disturbing for some image motives. Below 1x they become difficult to tolerate, and in my tests at 0.7x with a full-frame sensor there was also a clearly recognizable loss of sharpness. The inverse position, which in itself produces a somewhat smaller image scale, can reduce these problems somewhat below 1x, but the image remains unusable.
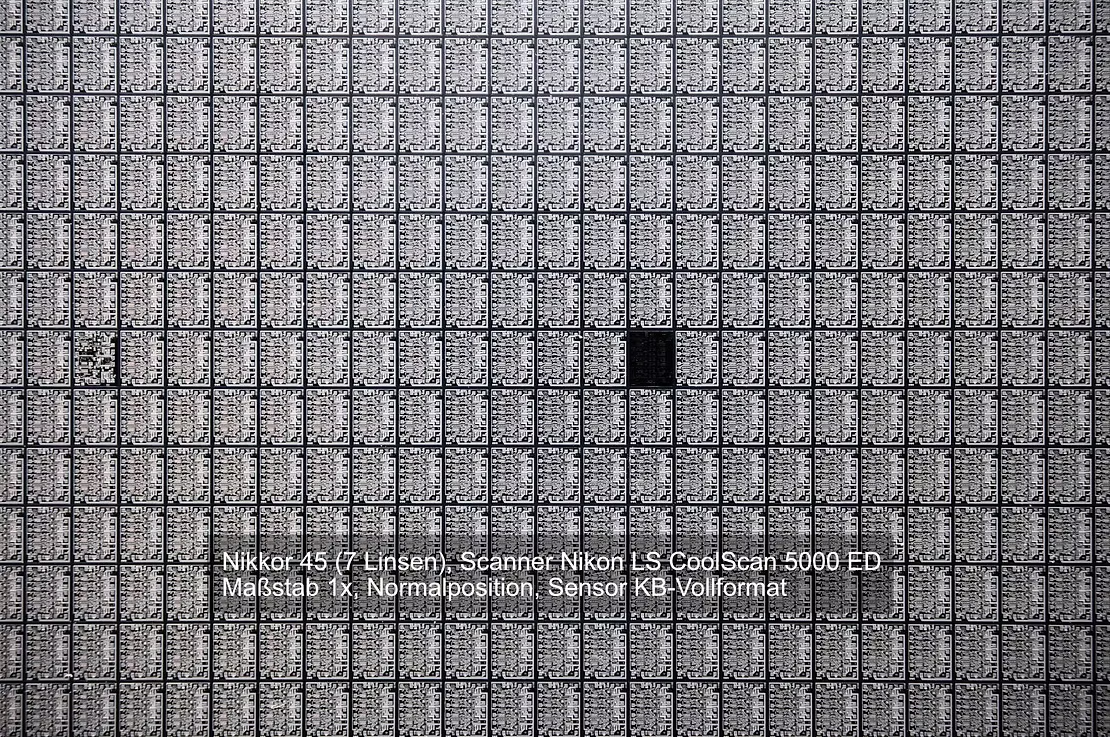
At magnification 1x in normal position in full format (white dot points to the sensor, extension 65 mm, visible image 36 mm) slight darkening of the corners, but possibly quite tolerable for many shots
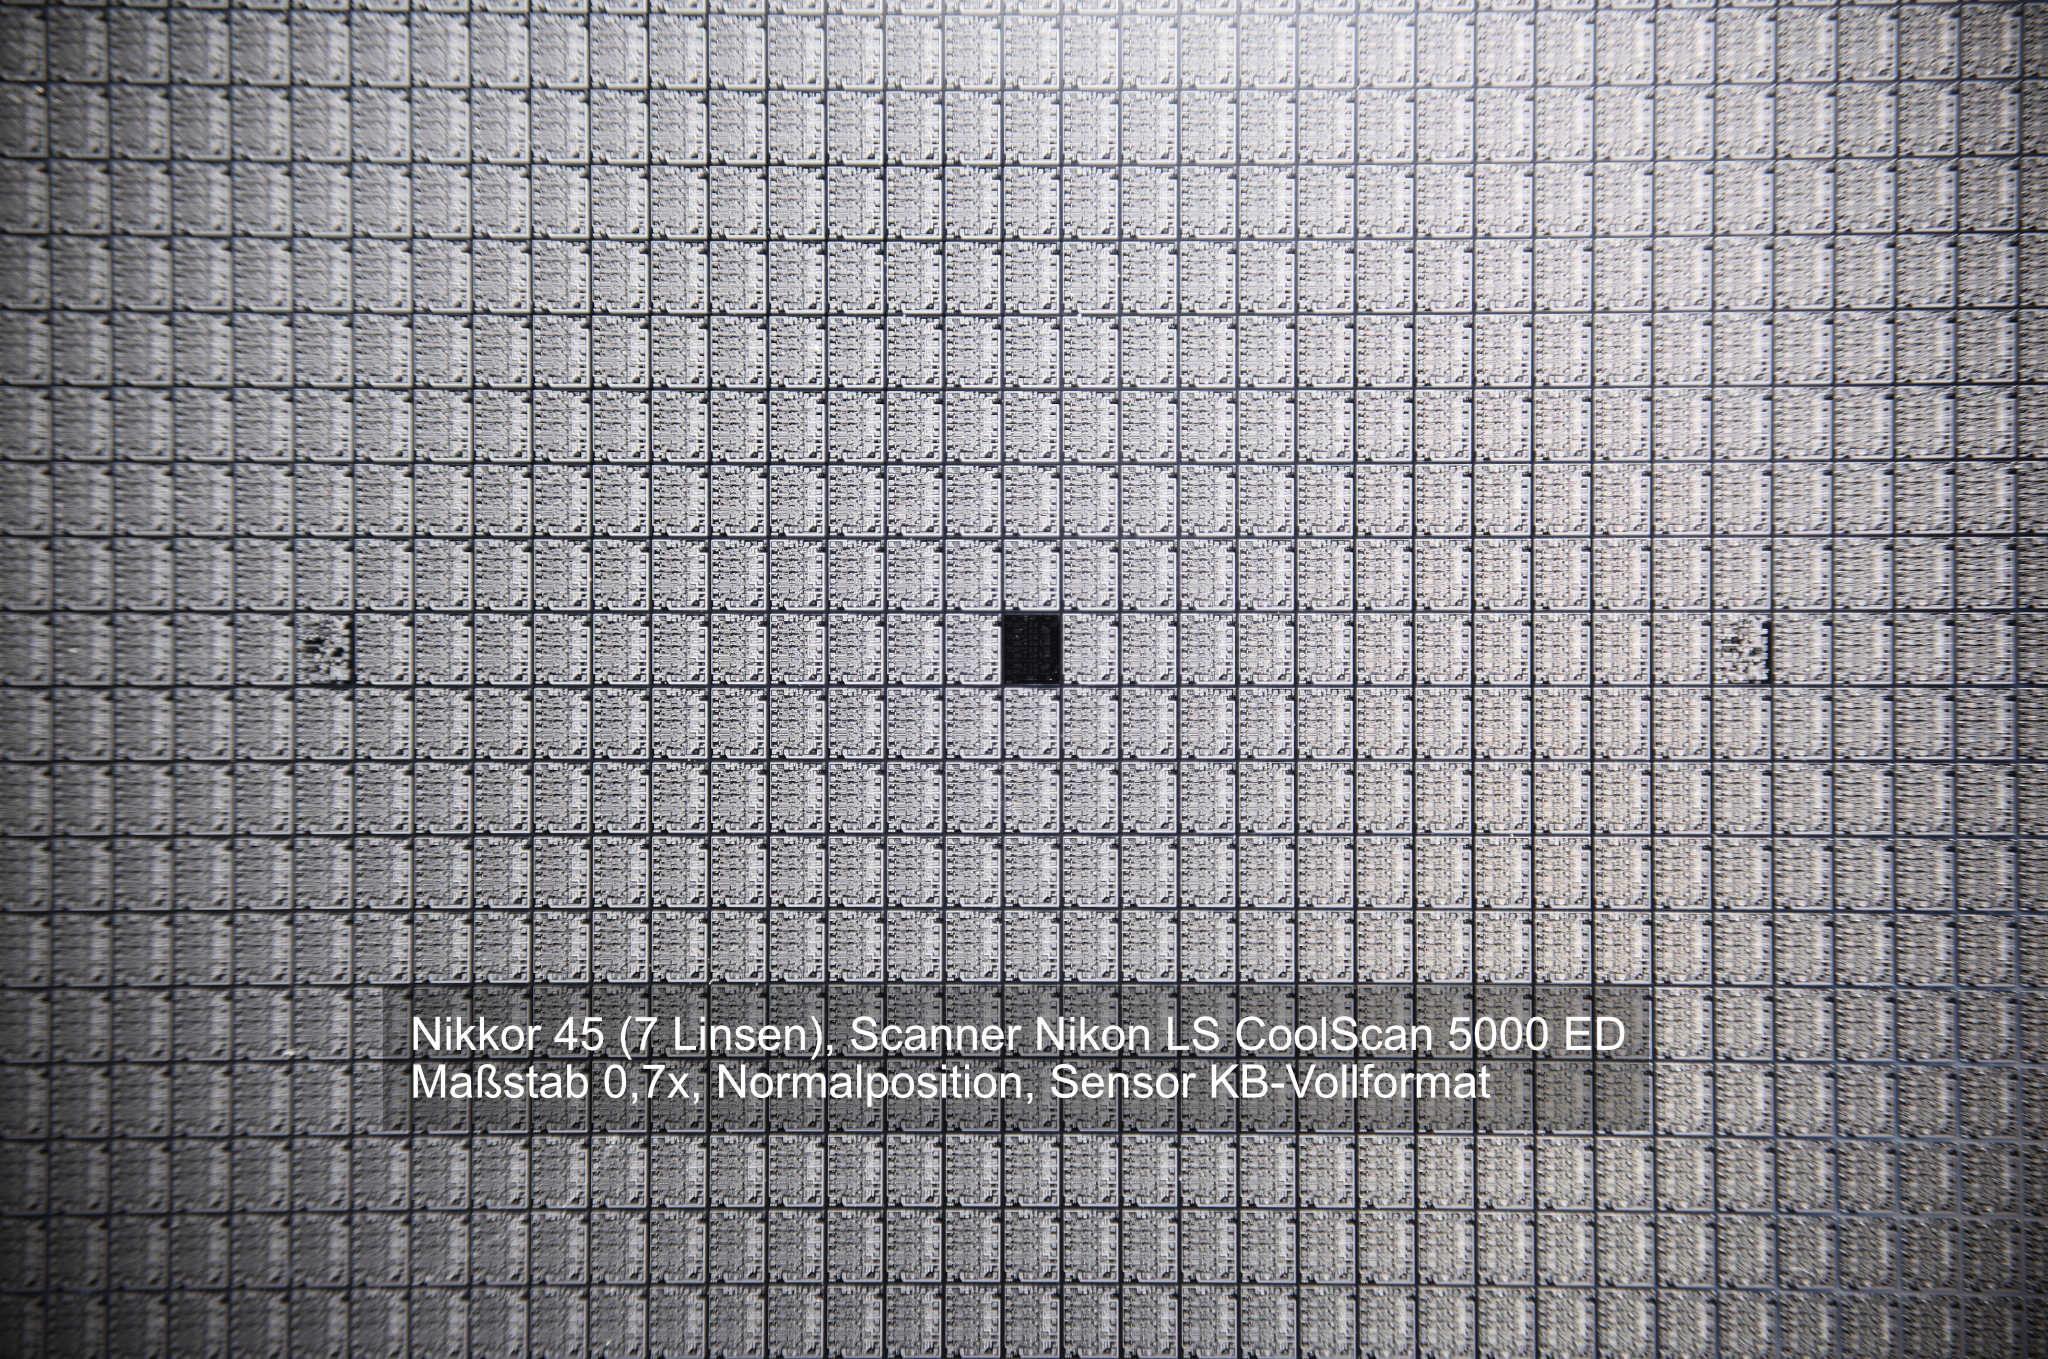
At magnification 0.7 in normal position in full format (white dot points to the sensor, extension 50 mm, visible image 51 mm) strong darkening of the corners, intolerable
To reduce the vignetting effect it is recommended to work in the reversed position as mentioned above and above magnification x0.8 and under x1.0 (include the whole film). Still a vignette will be visible on a full frame sensor. It is recommended to crop in a bit as to approach the APS-C format. To eliminate the rest of the vignetting use LLC correction in Capture one or lightroom.
The Scanner Nikkor ED 7 Element Lens is suitable for full-frame sensors at 1.33 and larger reproduction scales, and starting from 2x its sharpness performance can be increased slightly by using a variable aperture. With smaller sensors such as APS or MFT, there is no darkening of the corners, so that smaller reproduction scales are also possible here, as the diagram shows. This is where it delivers its best performance at magnifications between 1.1x and 1.5x. For image scales of 1x and below, the lens should be used in the inverse position with smaller sensors because it then works with a smaller image scale anyway.
Image quality
The image quality of this lens is beyond any doubt. The image is sharp from the center to the corners, free of distortions, and color edges (chromatic aberrations) are nowhere to be found. In contrast to the (also outstanding!) Minolta Dimage Scan Elite 5400 scanner lens, it also exhibits no image field curvature. The color reproduction is breathtaking.
The magnification can be increased to 2:1 and beyond by enlarging the extension, without any visible loss of quality. The working distance for focus stacking work is also sufficiently large to achieve good light distribution on the object, approx. 60 to 90 mm in full format.
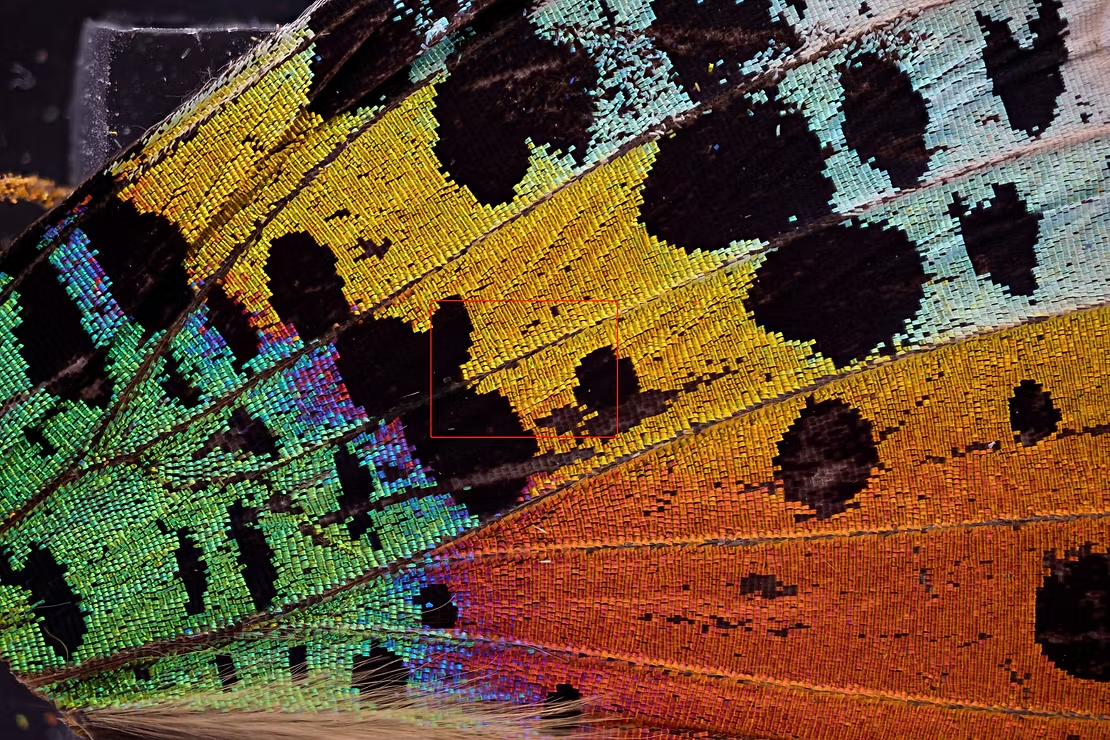
This wing scale image of the butterfly Chrysiridia rhipheus (distance sensor to light exit lens 80 mm, 1.38:1, picture file unprocessed) shows the enormous potential in color reproduction, and no darkening of the corners can be seen.

The sharpness of the image can be seen in this greatly enlarged image section
Removing the lens from the scanner
Removing the lens from this Nikon 35 mm scanner is much more difficult than with the Minolta Dimage Scan Elite 5400, as numerous parts have to be removed in order to take out this high-quality lens. However, this is not really a problem because the scanner is probably defective anyway and should no longer be used. However, even in this case, you should definitely keep all the remaining material to make it possible to repair other scanners, as this has become much more difficult since 2020 because Nikon stopped supplying spare parts in that year.
Never disassemble a working film scanner to get to the lens. Film scanners are a dying breed, and each of these devices is far more than the sum of its parts. Personally, I only dispose of a slide scanner if it is definitely defective and a repair really no longer seems sensible or is no longer possible.
Opening the housing depends a little on the model. Start with the screws at the bottom and rear. At the rear they are directly accessible, at the bottom you have to pull off the flat rubber feet to get to the screws (Coolscan LS 5000 ED or V ED LS-50). The housing is then pulled upwards in one piece.
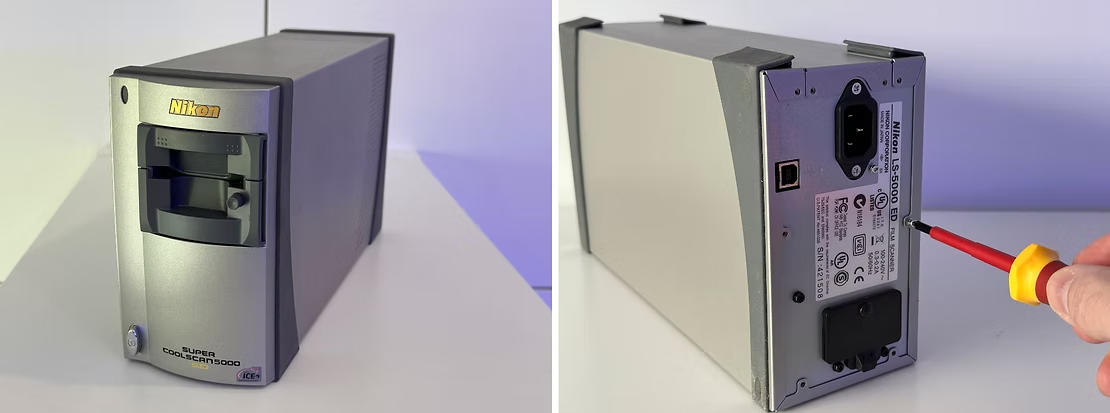
The Nikon Super CoolScan 5000 film scanner is one of the devices that work with the Nikkor ED 7 objective. For the LS 5000 ED and V ED LS-50 models, first remove the Phillips screws on the back.
Then lift up the rubber feet at the bottom to remove the Phillips screws underneath. Then pull the housing backwards so that the inside of the upside-down scanner is exposed.
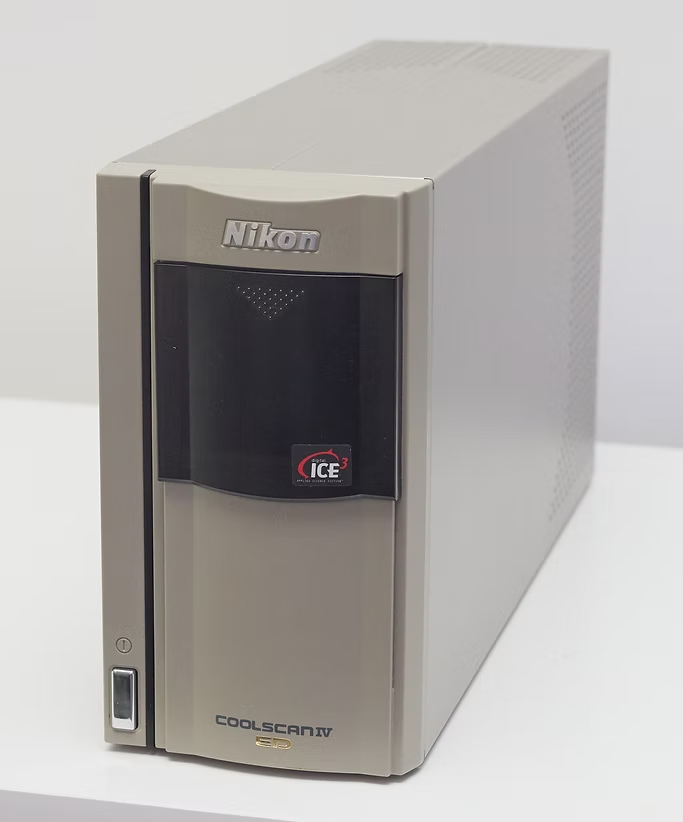
The Nikon scanner IV ED LS-40 also has the Nikkor ED 7 lens
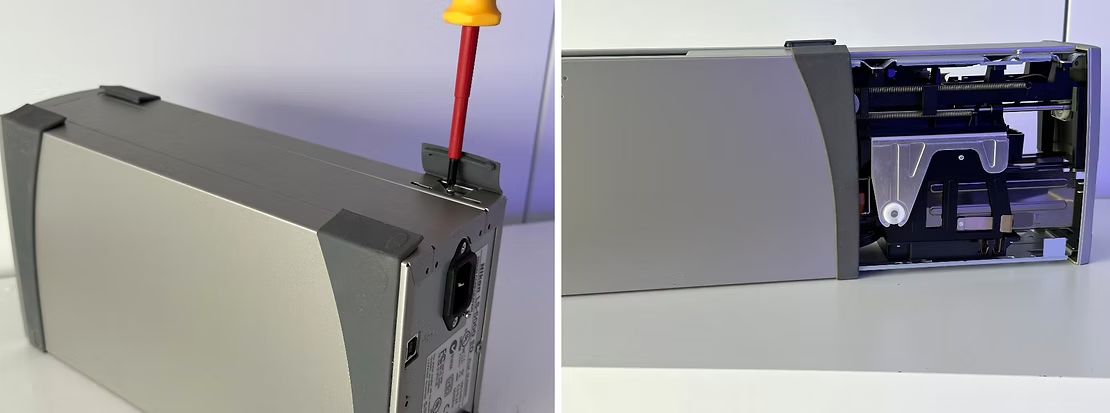
The LS-4000 ED and IV ED LS-40 models have all the screws on the back. The housing is in two parts and is removed on both sides. Despite the different housings, the inner workings of the four scanner models are essentially comparable.

For the LS-4000 ED and IV ED LS-40 models, remove the Phillips screws at the rear. The two halves of the housing can then be pulled off to the side. Look for thin cooling and dust protection plates at the top and bottom.
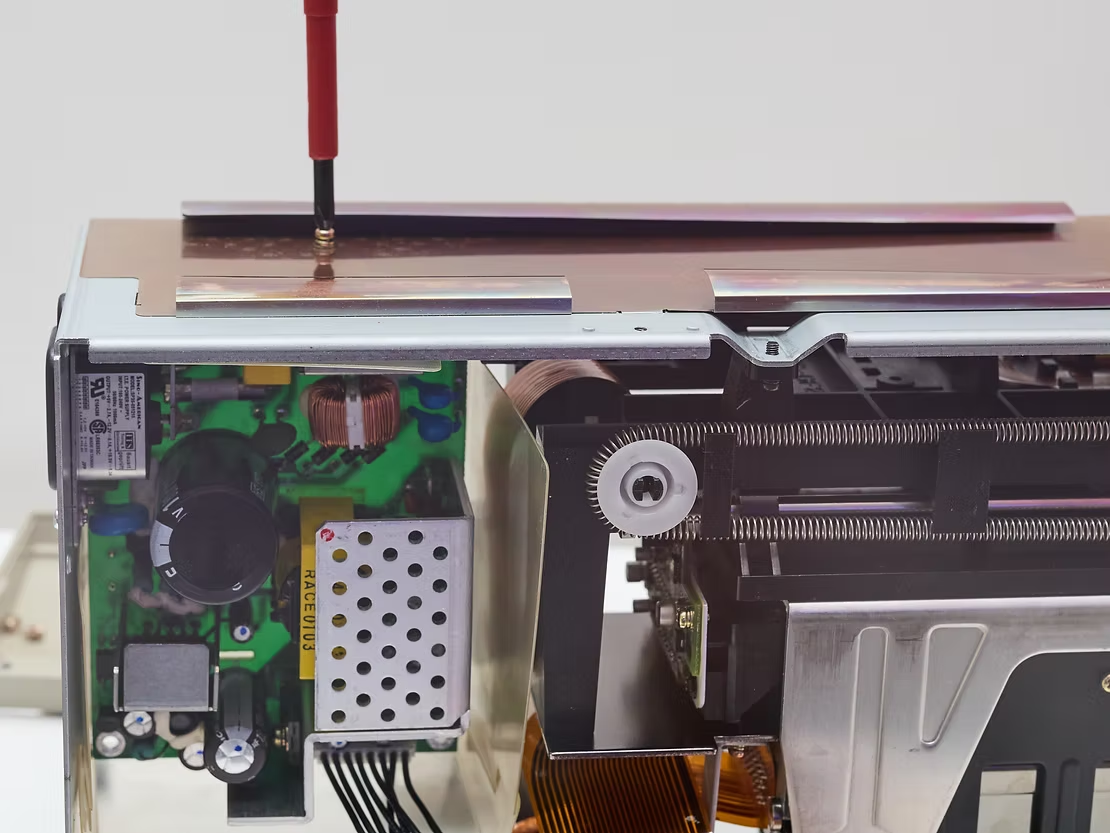
Now the actual disassembly begins. The best way to start is to loosen the plug connections on side A and on the top of the circuit board behind the rectangular metal cover. You can then unscrew the cover together with the circuit board.
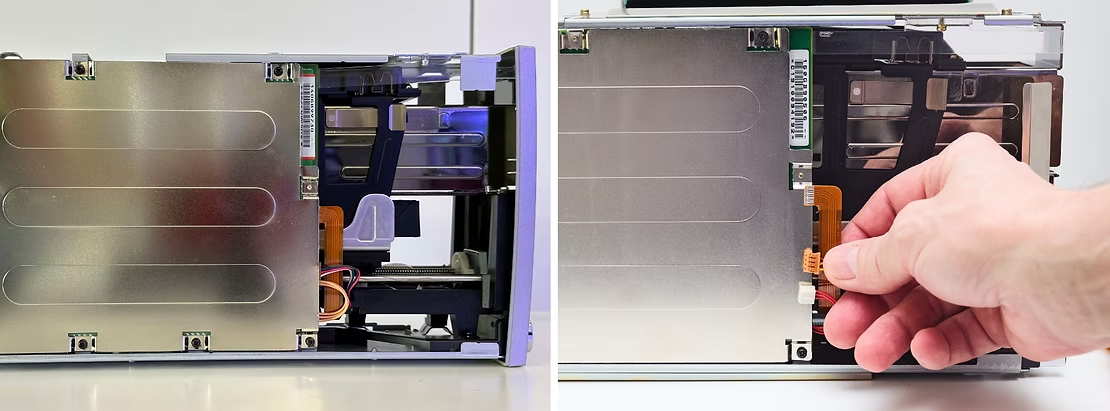
Picture left: If you look at the scanner in its normal position in front of you, you will see a large, rectangular cover on one side, behind which there is a circuit board with electronic components - let's call it side A (here CoolScan 5000). Picture right: Several flat connectors on the circuit board behind the metal plate are removed (here Coolscan IV ED LS-40).
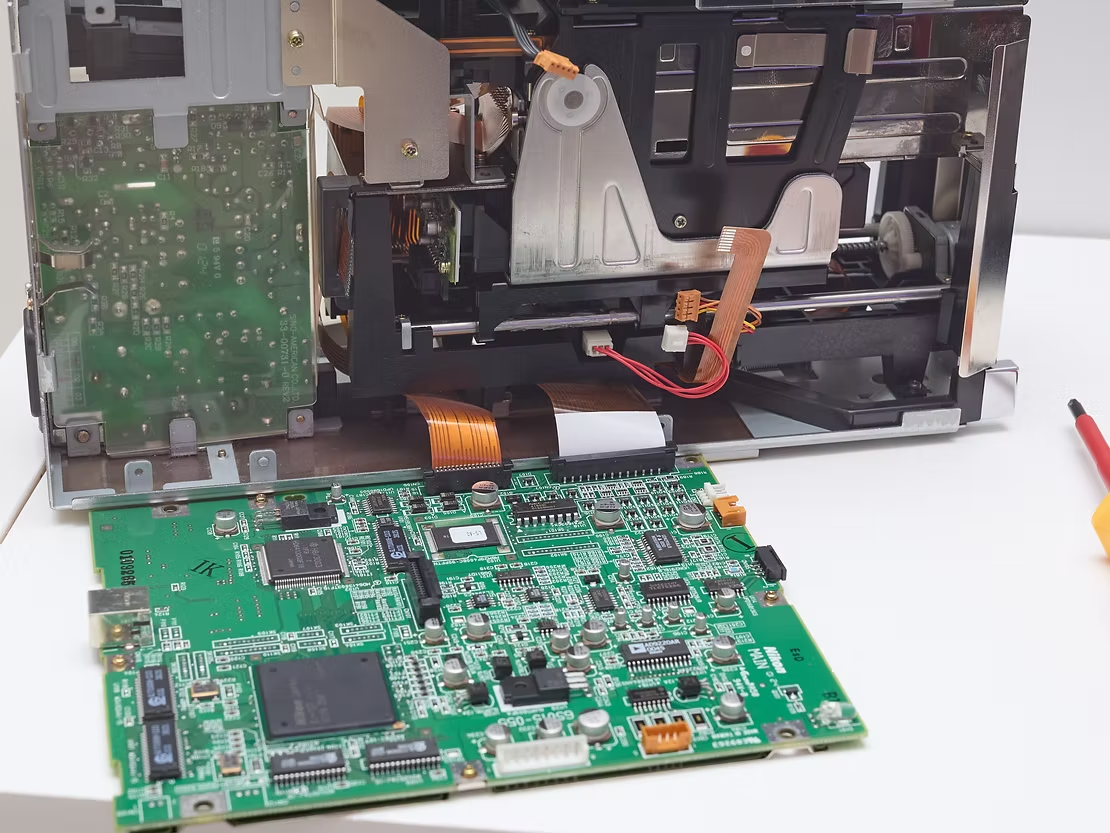
You can then remove the screws from the circuit board and take it off with the sheet metal (Coolscan IV ED LS-40)
Then remove the upper profile plate together with the thin cooling and dust protection plate (here Coolscan IV ED LS-40)
You can also unscrew the thin plate on the front that covers the stepper motor (here Coolscan IV ED LS-40)
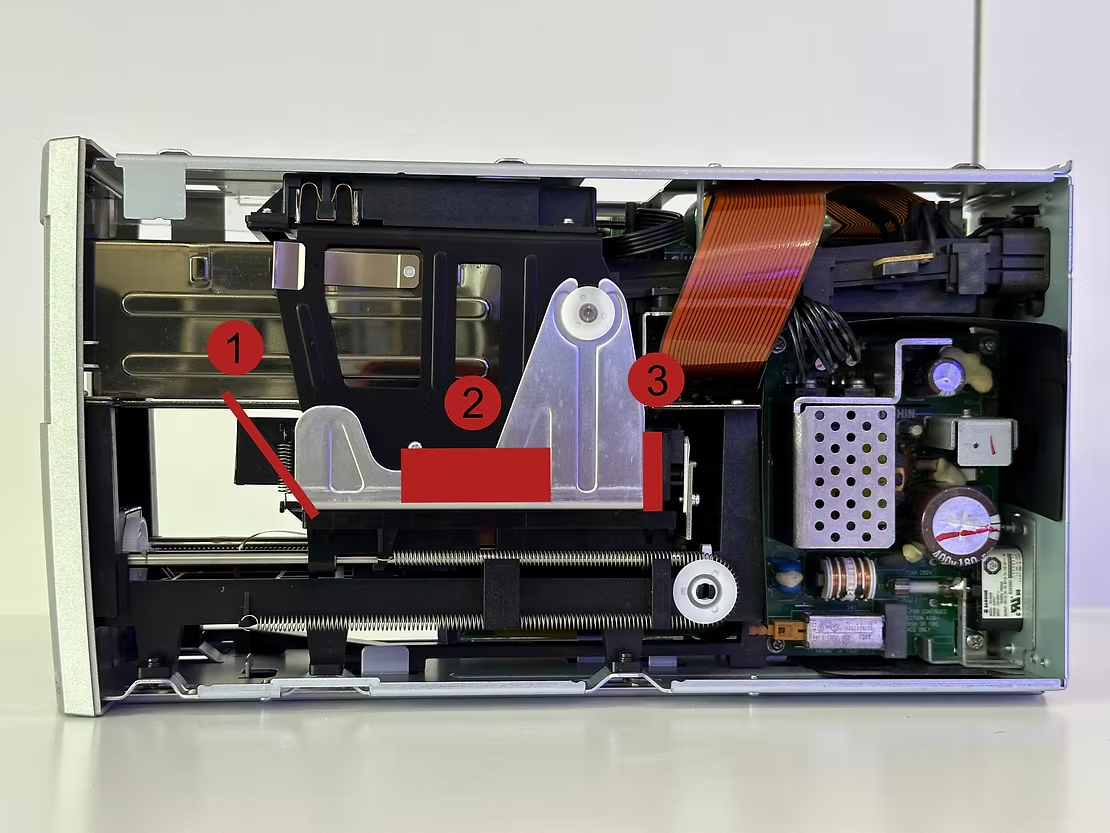
Your target is the component consisting of the film shaft and the scanning unit with lens and sensor, marked in red here (side B, 1 mirror position, 2 lens position, 3 sensor position, here Coolscan LS 5000 ED)

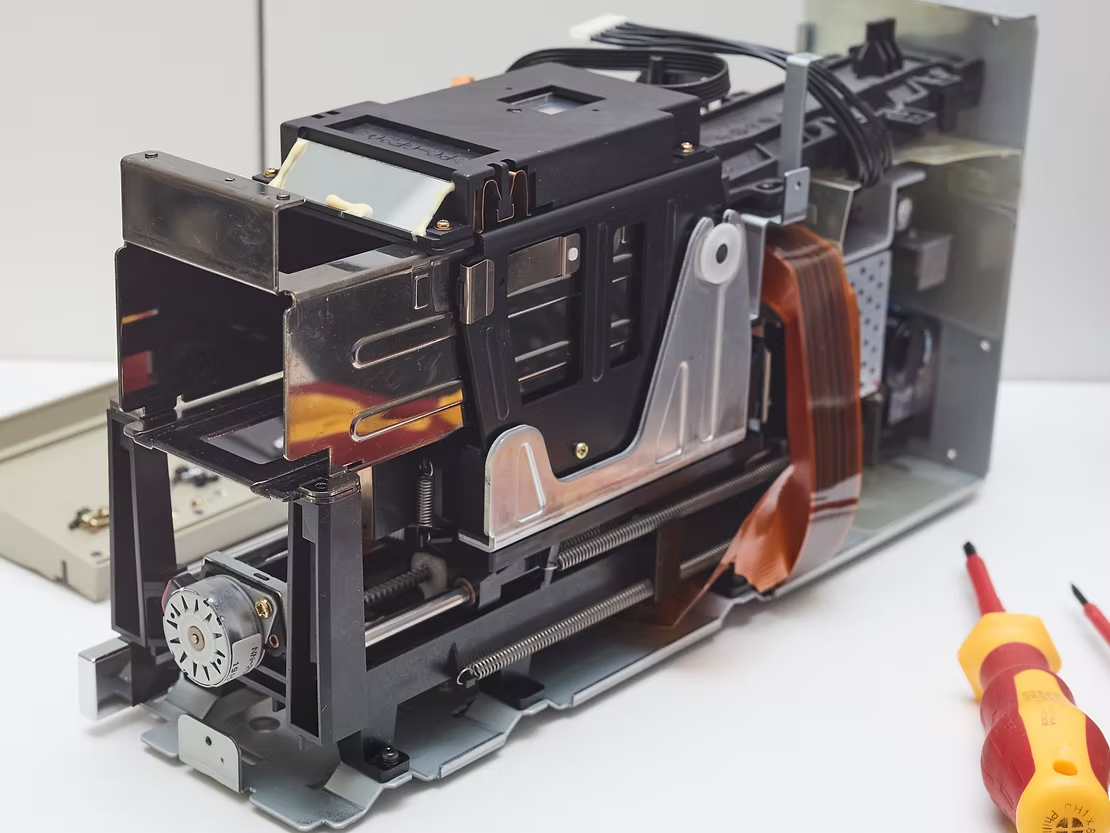
The large, black component that you have to remove is mounted in the L-shaped sheet metal profile with two white plastic axle holders. You can lift these off with a screwdriver (pictures from here on all Coolscan IV ED LS-40).

Now loosen and remove the long, black plastic holder behind the black component with a few screws and unhook a small spring on the underside
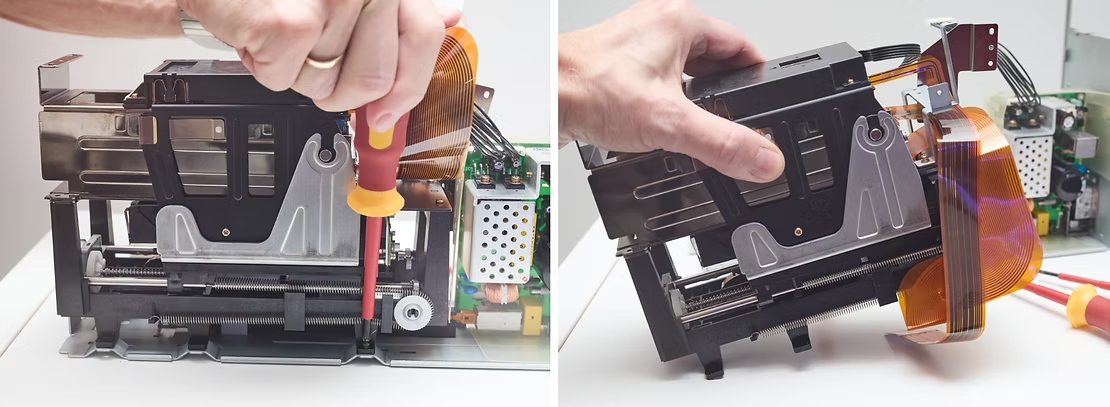
Now you can loosen and remove the entire and complex black component with three screws at the bottom

Pull the upper part with the film slot and the scan unit upwards to separate it from the rest
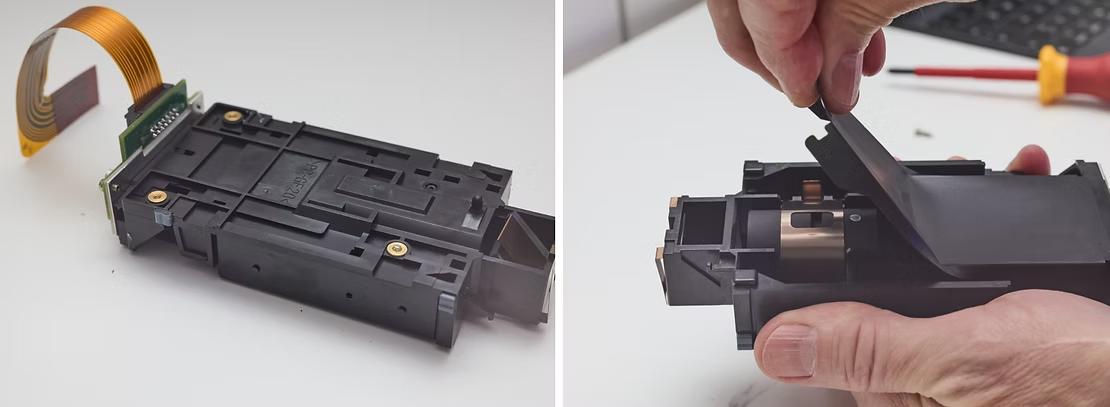
If you now remove the hollow film shaft, you are holding the actual scanning unit in your hand, the heart of the scanner. This flat, black box contains the lens and the sensor. The thin, black cover plate, which is glued on, is pulled off.
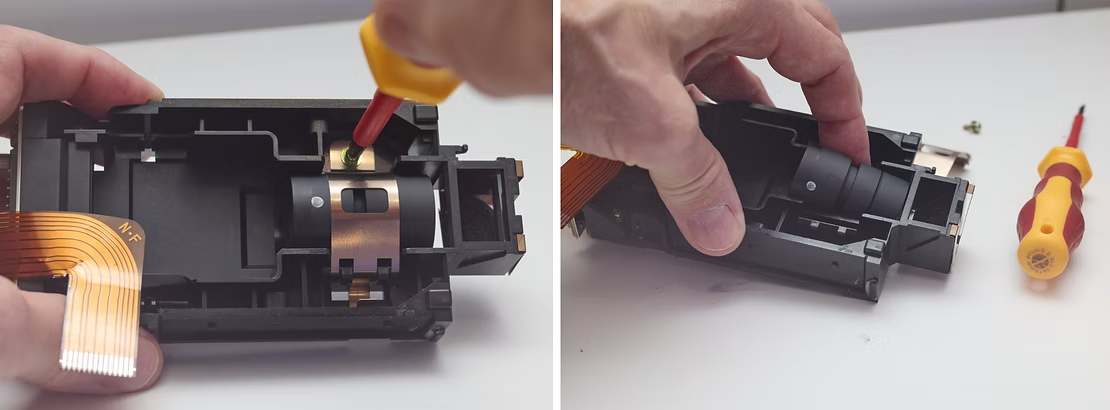
Remove a screw from the metal lens holder. Now you can remove the lens. Here you can see that the end of the housing without the white dot is aligned with the mirror (right), so the white dot in the original position points towards the sensor of the scanner. The point towards the sensor is therefore also the normal position on your camera.
The lens
You can then completely dismantle this removed assembly in order to remove the lens. f you hold the lens in your hand, you will see that it has a wide groove running all the way around in the middle. At one end the housing is in one piece and has a white dot marking, at the other end it is divided into two parts by a thin groove. The side without the circumferential groove with the white dot marking is the light exit side. It was facing the sensor in the scanner, so it points towards the camera when focus stacking in the normal position. The housing diameter is 24.3 mm.
- Aperture: Forward f/2.8, and f/2.6 in reverse (dot facing sensor)
- Optical design: The 7 elements in 4 groups including 3 ED glass elements
- Focal length: 45mm
- Chromatic Correction: This lens is an APO or apochromatically corrected in the range of 438 – 852nm. This correction extends into infrared range to cover the scanners LED output that is used for scratch and dust detection. The infrared light wave-length used by the scanner allows it to pass through film emulsion of negatives and slides without resistance, but the scratches and dust particles reflect it. The image is scanned two times, the first, as the normal RGB scan, and the second, captures defects like dust and scratches, preserving the important details.
An apochromatic or APO lens is corrected for chromatic aberration at the red, blue, and yellow wavelengths. This really adds to the subjective perception of sharpness. An APO objective should have correction of both types of chromatic aberrations or CAs, lateral CAs, or color fringing, and longitudinal CAs, or LoCAs, also called Bokeh CAs.
- Resolution: Nominal optical resolution of 4,000 dpi. The site, www.filmscanner.info, found the 5000 ED scanner to have an effective resolution of horizontal 4100 dpi and vertical 3650 dpi, averaged out to about 3900 dpi. It is rare for a scanner to reach their nominal resolution.
- Mounting Threads: None. This lens has no mount and no filter threads.
- Coverage: Full frame sensor format, with an asterisk
- Country of origin: Japan
The 7 element Scanner Nikkor ED is a tiny lens, as you can see below, next to a Sigma 50mm macro lens. One of only problems with the Scanner Nikkor lenses is setting it up for photography, since there are no mounting threads!

Scanner Nikkor ED 7 Element lens, Scanner Nikkor ED 14 element lenses from the Super CoolScan 8000 ED scanner and the Sigma 50mm f/2.8 macro lens for scale.
Mounting
Option One
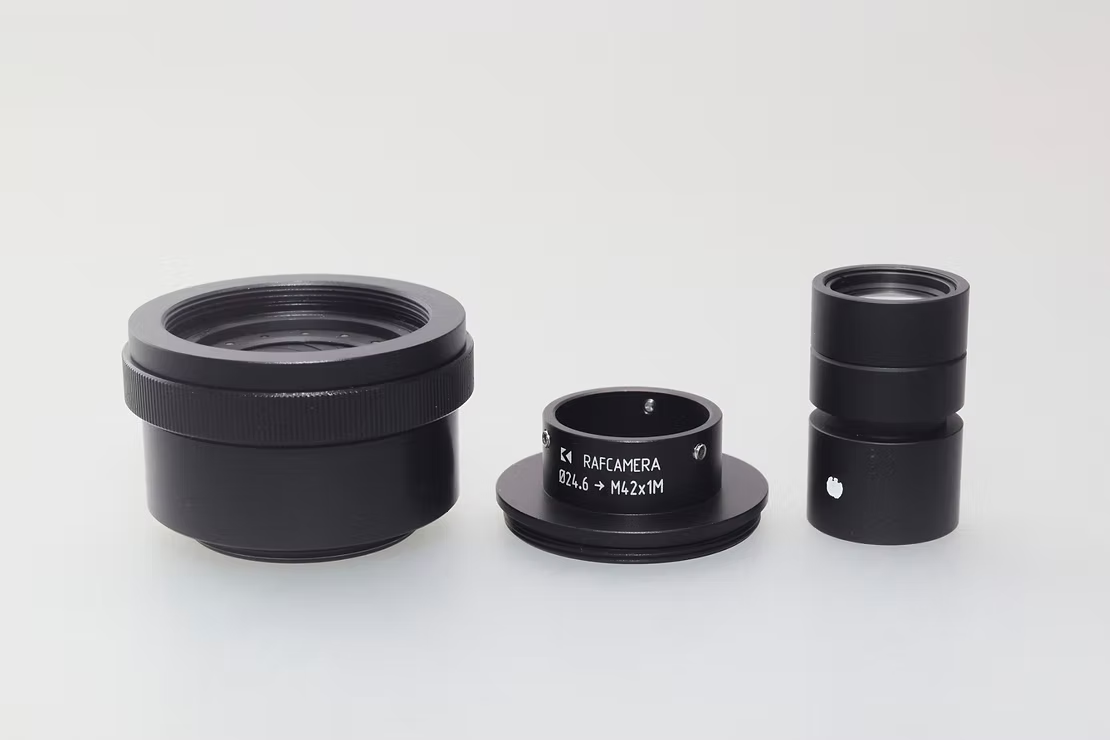
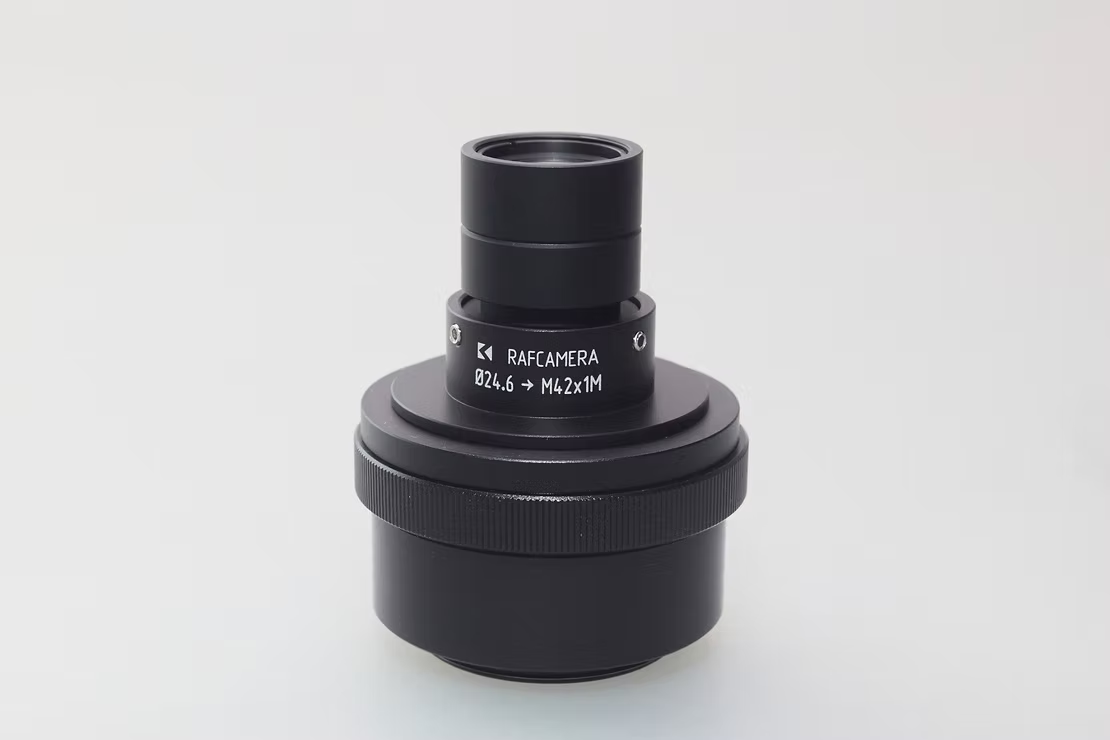
An adapter offered by Rafael Pankratau (RAF Camera) is particularly recommended for attaching the lens to the camera. With its 24.3 mm diameter, it is held precisely by three headless screws and adapted to a male M42 thread.
It can then be easily attached to a camera using the appropriate adapter, with the necessary extension. This is easily possible with M42 intermediate rings onto which the adapter can be attached directly.
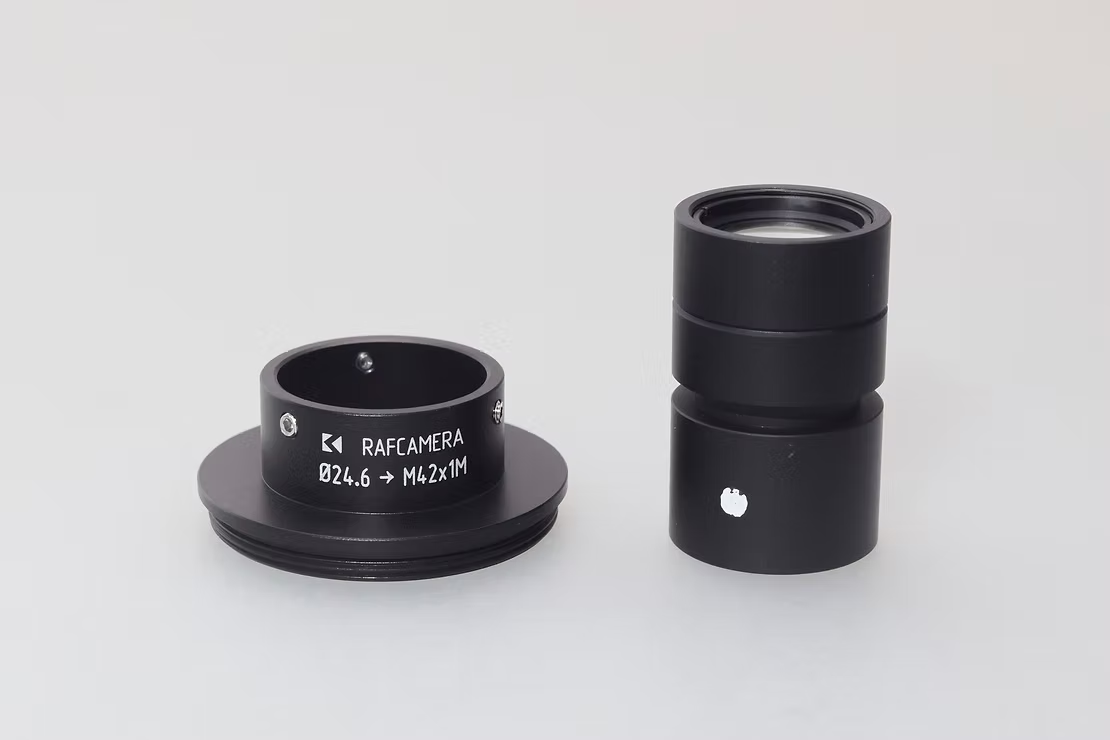
A special adapter is available from RAF Camera, which has a suitable aperture and adapts to an M42 thread

Three headless screws hold the lens in place
Option two
Both ends of the lens barrel fit snugly within C extension rings in my possession, and the end of the barrel sits against a flat ledge in the rings. This prevents any significant misalignment or decentering of the lens.
C rings from different manufacturers may have different sizes and tolerances. This includes not only the internal diameter of the tubes, but even the diameter and pitch of the threaded mount. A few of my C extension rings, purchased from different manufacturers from China on eBay, fail to screw into properly sized C mounts or on properly sized C lenses. Test the different pieces of setup together to verify their reciprocal compatibility, before epoxying extension rings to the lens barrel.
The C male thread at the end of the ring slightly decreases the working distance, but at the same time provides a shallow lens shade that helps to avoid direct illumination of the front element. At magnifications normal for this lens, there is plenty of working distance left. The C extension ring does not cause vignetting on Micro 4/3 sensors, but you need to test before epoxying the extension tubes in place, if you plan to use larger sensors.
A little epoxy keeps the C extension tubes in place. Rear caps for C lenses can be used to protect the front and rear elements when the lens is not in use.
A reversible way of mounting this lens could use a slightly longer C extension tube, modified by drilling and tapping three M3 holes in the sides of the tube. Thumbscrews or headless screws can be used to hold the lens in place.
Aperture
Not every lens has its highest sharpness performance at open aperture. The sharpness performance of some scanner lenses can be increased somewhat if a variable aperture is installed behind them on the sensor side. This also applies to the Scanner Nikkor ED 7 Element Lens, especially for magnifications from 2X or 2:1. Such variable apertures are also available with an M42 thread, female on one side and male on the other, so that they can simply be placed in between for this installation.
By default, the lens has a design aperture of about f/2.8, in reverse position f/2.6 (both values Robert O'Toole). With a variable aperture fitted, I recommend a series of tests with individual shots of different apertures in order to experimentally determine the highest image sharpness. However, take care not to produce diffraction blurring by using an aperture that is too small.
For camera scanning I wouldn't recommend this route since we are working around x0.9 magnification and the vignetting becomes too strong. But feel free to experiment.
With a suitable aperture, the already very high sharpness performance of the lens can be increased even further
The aperture shown here has a long body that adapts to M39, but shorter ones are also available that extend the focuser less
The aperture in millimeters corresponds to the ratio of the focal length to the f-number, in this case:
Focal length in mm : aperture value as a number = aperture opening in mm
45 : f/2.8 = 16.07 mm (numerical aperture without variable aperture)
45 : f/3.5 = 12.85 mm (added variable aperture set to f/3.5 or 12 mm)
Price and availability
Scanner Nikkor ED 7 Element lenses are available only on the used market, since Nikon discontinued the Coolscan some time ago. In early 2017, the going rate for these lenses was only $25, but over time, they have become a little more well known, so the supply has tightened up, raising prices on the used market, and Ebay.
One strategy that still works well is to search ebay for non-working, parts only, Coolscan scanners. These are sometimes available for as low as $100 online, sometimes even less than that. If the scanner is in good condition, you can sell the case and spare parts to help offset the cost of the lens.
The 7 elements Scanner Nikkor lens is found in these Nikon scanners:
- Coolscan IV ED LS-40
- Coolscan V ED LS-50
- Super Coolscan 4000 ED LS-4000ED
- Super Coolscan 5000 ED LS-5000ED
The 4000 is probably the most common Nikon scanner on the used market. But don't overpay, I have picked up a parts only condition 4000 ED scanner for as low as $40-50. You should be able to find a non-working 4000 scanner for less than $150 if you are patient.
Test: SCANNER NIKKOR ED 7 ELEMENT LENS vs the Canon MP-E 65 f/2.8 1-5x macro lens at 1.3x
The 6 inch silicon wafer makes the perfect test subject. The disk is perfectly flat and has plenty of super-fine details. Best of all, a disk will not warp, bend, or twist in the middle of a test, like natural targets such as butterfly wings like to do.
Before this test I ran the Scanner Nikkor from 1x to 1.5x and it looked like the 1.3x to 1.35 x images were sharpest. The test was run at 1.3x, with the MP-E set at f/4, the sharpest and highest resolving aperture for this lens at this magnification ratio. The MP-E was shot from f/2.8 to f/5.6 for this test and the sharpest images were selected for the comparison.
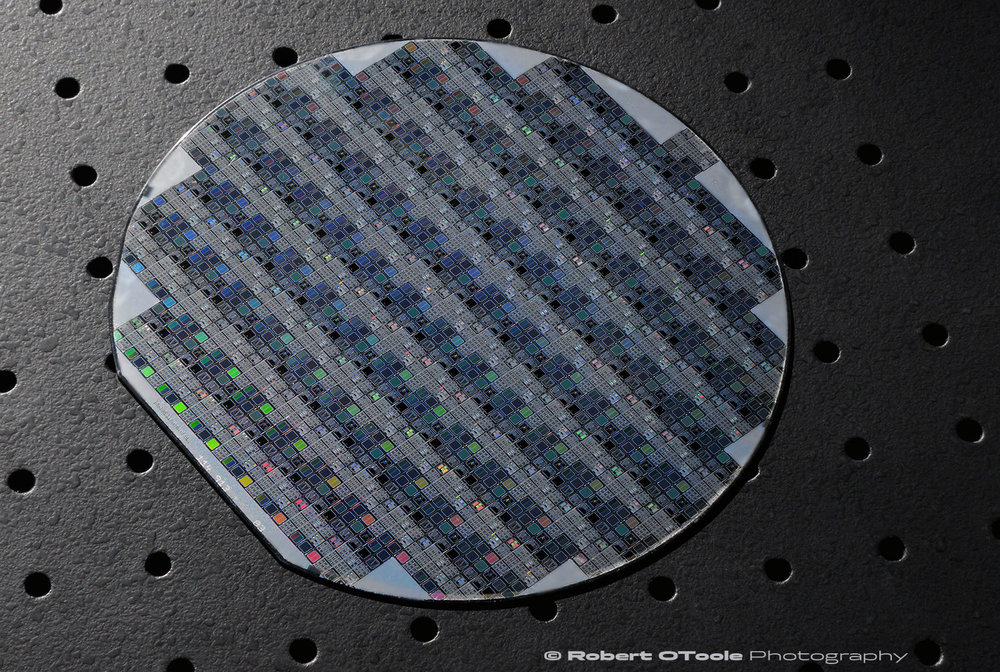
Vintage 6 inch silicon wafer test target
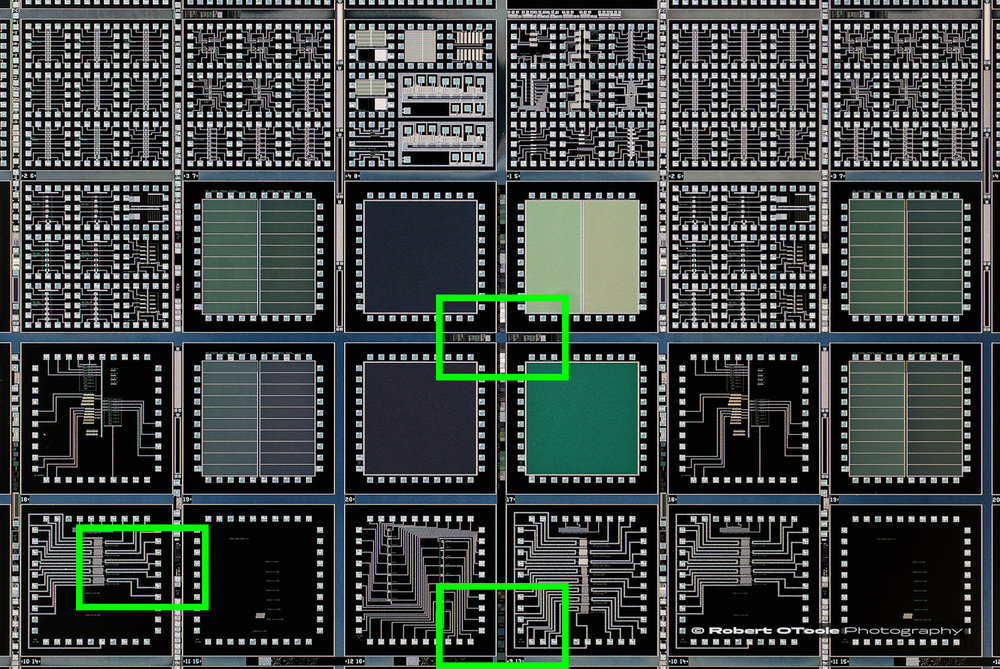
100% crop areas shown in green.
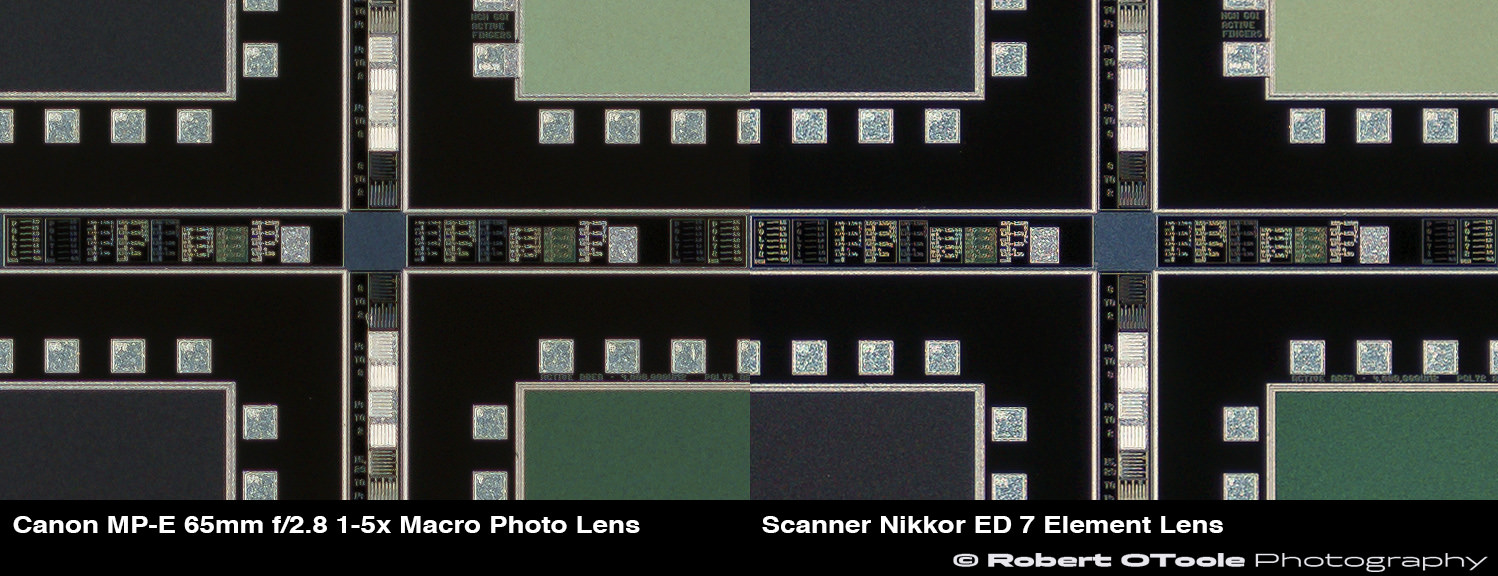
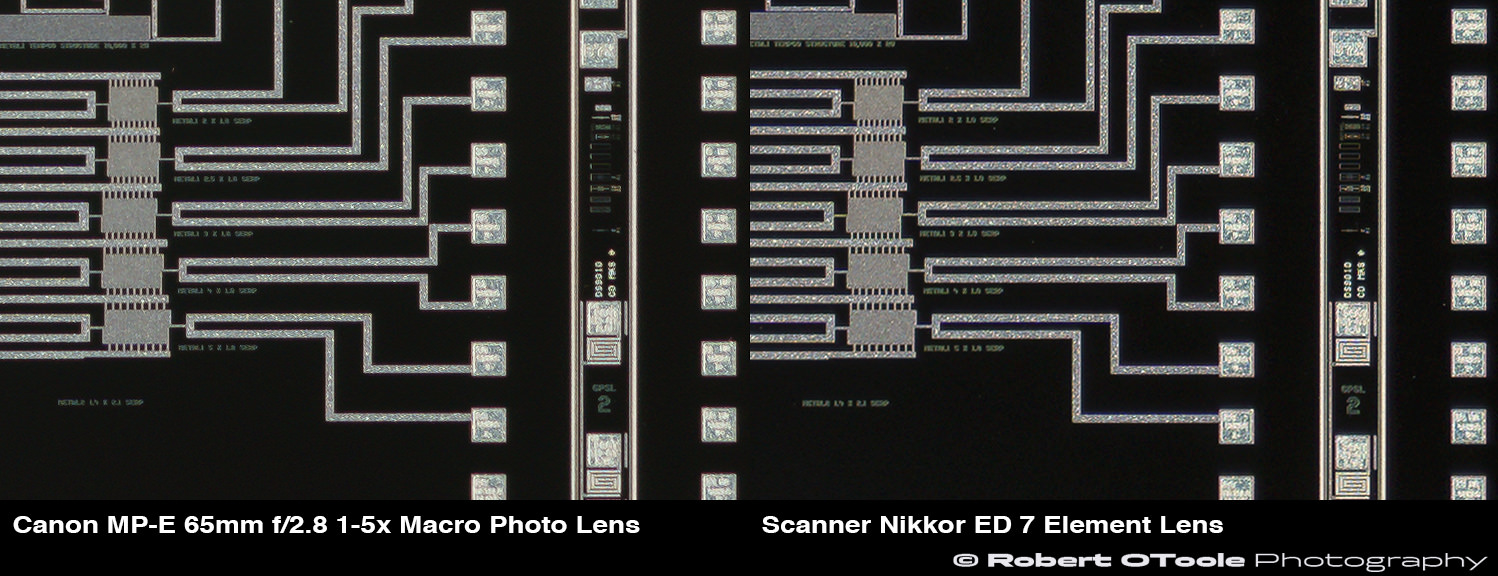
100% center crops, Canon MP-E 65mm f/2.8 1-5x Macro Photo Lens at f/4 vs the Scanner Nikkor ED 7 Element Lens
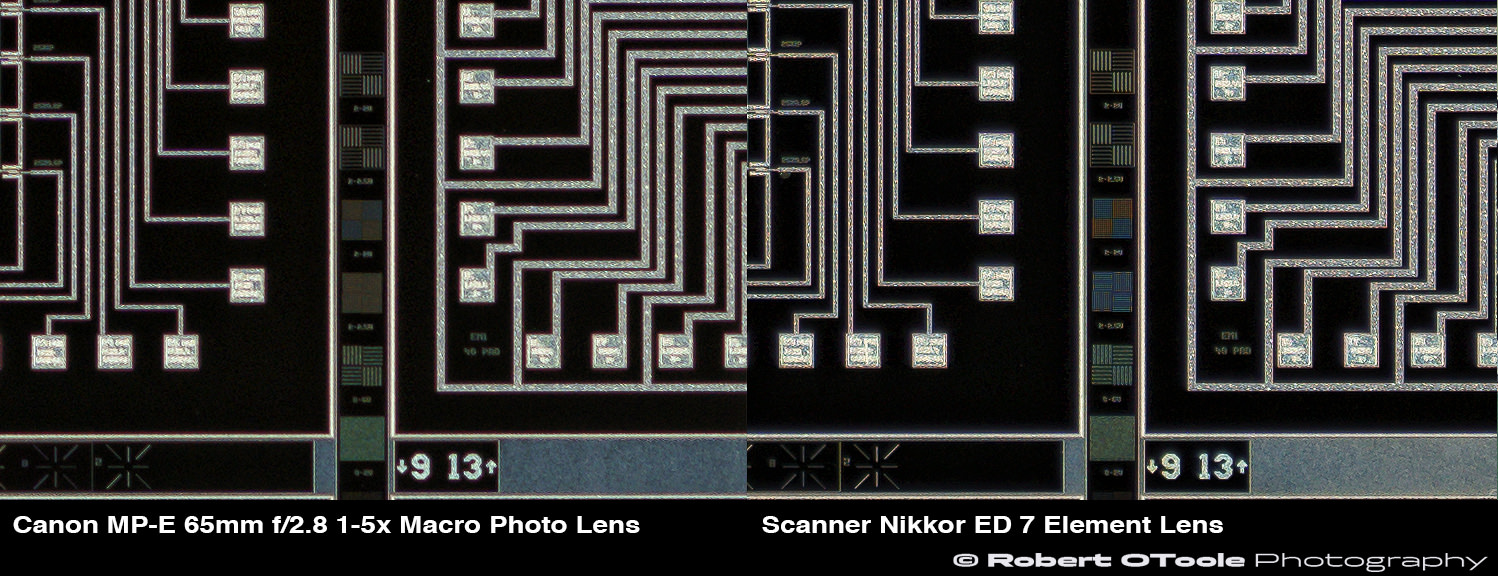
100% edge crops, Canon MP-E 65mm f/2.8 1-5x Macro Photo Lens at f/4 vs the Scanner Nikkor ED 7 Element Lens
100% corner crops, Canon MP-E 65mm f/2.8 1-5x Macro Photo Lens at f/4 vs the Scanner Nikkor ED 7 Element Lens
TEST SUMMARY
Although the Scanner Nikkor lens certainly doesn't look impressive, the image quality is. In all of the 100% actual pixel crops, the Scanner Nikkor is sharper and more contrasty. The edge crop shows an especially large resolution difference. Honestly, I was a little surprised at the results since the MP-E is such a sharp lens.
One factor that you don't see in the above crops, is the difference in chromatic correction between the Scanner Nikkor lens and the MP-E 65. Canon claims, The (MP-E) lens design contains UD-glass elements to suppress chromatic aberrations which often become apparent at high magnifications, but in reality the lens has LoCAs, also known as Bokeh CAs.
In the examples below, the APO corrected Scanner Nikkor lens crop is completely free from CAs, the Canon MP-E is not.

Longitudinal chromatic aberration or Bokeh CA crops, Canon MP-E 65mm f/2.8 1-5x Macro Photo Lens at f/4 vs the Scanner Nikkor ED 7 Element Lens
LINKS FOR MORE INFO:
My favorite optical expert, Marco Cavina, offers an excellent look at the optical designs of Scanner Nikkor ED lens prototypes on his site. This PDF is in Italian, so you will need to use an online translator like google translate (https://translate.google.com/):
http://www.marcocavina.com/articoli_fotografici/articolo%20Scanner%20Nikkor%20ED.pdf
![[articolo Scanner Nikkor ED.pdf]]